Optical Illusion Art (OP Art) & an Intro to Line
- Zip
- Prezis
Description
This lesson is meant to act as an introduction to one of the most important elements of art, line and to some OP Art artist who use it well (Bridget Riley & Victor Vaserely). It is targeted to students between the 6th and 8th grade levels and takes about 1 day to introduce, 1 day to finish the warm -up/ practice worksheet and 2 days to create and finish the final project for a total of 4 days give or take. There are 2 handouts with examples and step by step instructions to create OP Art patterns, one has simpler patterns and another has more complex patterns and you can use whichever you feel fits your student's needs best.
This lesson is really fun to teach because it shows how powerful the line can be and as you add more and more lines your patterns become more and more complex and eventually create optical illusion art. The lesson also acts as an introduction to 3D work and when finished the cubes can be displayed with a black light overhead and when combined they end up creating a pretty amazing installation.
Almost all of my lessons incorporate a Prezi Presentation in them somewhere and I have found that it is a much more interesting and effective way to present new information to students. Powerpoint slides get boring after seeing them being used in classrooms over and over again to present new lessons and you can just see students start to glaze over by the 3rd or 4th slide. If you don't use or haven't heard of prezi give it a quick google and you will find how it can make a more dynamic presentation.
5th-6th grader's lesson:
~Use the "easier" handout with examples for students to follow, the steps are broken down better
~You can choose to leave the cubes black and white or even just use pencils depending on what supplies you have. This will shorten the project's duration by a few days.
~Have students use regular tipped sharpie markers for less detail
7th-8th:
~Use the "harder" handout with examples of more complex op art patterns
~Have students use "fine point" sharpie markers for very fine details and more complex op art
Here is a break down of the resources that I have included in this lesson:
Lesson Plan- This has the lesson broken down into easy to understand steps and includes a list of materials needed and approximately how long the lesson should take to introduce. This lesson also includes notes on how to accommodate students with IEP's and steps that you can take when teaching this lesson.
Prezi Presentation- At the top of the lesson plan is a link to the prezi presentation that i created to accommodate this lesson, you will need an internet connection to present it or you can download it to be used offline (just ask and i can instruct you how to do this). The prezi introduces the 5 elements of art, Victor Vaserely, Bridget Riley and great examples of optical illusion art that students seem to really enjoy looking at and figuring out how and why they work.
Rubric- I pass this rubric out at the beginning of each lesson so students understand what they will be graded on and what is expected of them. If you'd like to adapt the lesson to more advanced students then follow the instructions above for older age groups. The rubric is front and back and only takes up half a sheet of paper, it also has a self reflective part at the end for students to fill out. Students should turn the rubric in with their finished project and I will put their final grade on it and return them both.
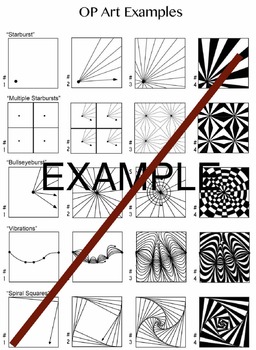
Handout (easy & hard)- This handout is a quick and easy to understand reference for student to use if they forget what steps to take when creating an op art pattern, it solves the issue of commonly asked questions at the beginning of a lesson. One is simpler and only contains a few examples with easier steps and one contains more complex patterns and more of them.
Practice Worksheet- This is a worksheet with 6 blank cubes where students can be creative and brainstorm their own op art ideas and also practice some of the patterns demonstrated on their handout. This way students know what they like and what they can create before they start on their final cube.
Final Cube Template- This is just a blank template that you can either a) print out as a template and have students trace and recreate their own or b) print one out for each student and they simply draw on it and then cut out to assemble. (i suggest you use thick paper so the cubes are easier to assemble)
Student Examples- There is a folder with 9 student examples in it and they range from beginner to advanced. These are nice to show the students so they can see what is possible by looking at the more advanced ones and the beginner projects act as an example of commonly made mistakes and things to avoid.
* ALL documents except for the handouts and cube template are in word doc. format so they can be tweaked and edited to your liking.
Cheers


